The Database
This is the second part in a series on How To Create A Blog with PHP and MySQL. You can get the first part here
We will continue where we left off in the last tutorial. In this section we will be working on our database design and user authentication (registration and login). Create a database named complete-blog-php. In this database, create 2 tables: posts and users with the following fields.
posts:
+----+-----------+--------------+------------+
|     field      |     type     | specs      |
+----+-----------+--------------+------------+
|  id            | INT(11)      |            |
|  user_id       | INT(11)      |            |
|  title         | VARCHAR(255) |            |
|  slug          | VARCHAR(255) | UNIQUE     |
|  views         | INT(11)      |            |
|  image         | VARCHAR(255) |            |
|  body          | TEXT         |            |
|  published     | boolean      |            |
|  created_at    | TIMESTAMP    |            |
|  updated_at    | TIMESTAMP    |            |
+----------------+--------------+------------+
users:
+----+-----------+------------------------+------------+
|     field      |     type               | specs      |
+----+-----------+------------------------+------------+
|  id            | INT(11)                |            |
|  username      | VARCHAR(255)           | UNIQUE     |
|  email         | VARCHAR(255)           | UNIQUE     |
|  role          | ENUM("Admin","Author") |            |
|  password      | VARCHAR(255)           |            |
|  created_at    | TIMESTAMP              |            |
|  updated_at    | TIMESTAMP              |            |
+----------------+--------------+---------+------------+
ad
You can create these tables using these commands.
users:
CREATE TABLE `users` (
  `id` int(11) AUTO_INCREMENT PRIMARY KEY NOT NULL,
  `username` varchar(255) NOT NULL,
  `email` varchar(255) NOT NULL,
  `role` enum('Author','Admin') DEFAULT NULL,
  `password` varchar(255) NOT NULL,
  `created_at` timestamp NULL DEFAULT CURRENT_TIMESTAMP,
  `updated_at` timestamp NULL DEFAULT NULL
) ENGINE=InnoDB DEFAULT CHARSET=latin1;
posts:
CREATE TABLE `posts` (
 `id` int(11) NOT NULL AUTO_INCREMENT PRIMARY KEY,
 `user_id` int(11) DEFAULT NULL,
 `title` varchar(255) NOT NULL,
 `slug` varchar(255) NOT NULL UNIQUE,
 `views` int(11) NOT NULL DEFAULT '0',
 `image` varchar(255) NOT NULL,
 `body` text NOT NULL,
 `published` tinyint(1) NOT NULL,
 `created_at` timestamp NOT NULL DEFAULT CURRENT_TIMESTAMP ON UPDATE CURRENT_TIMESTAMP,
 `updated_at` timestamp NOT NULL DEFAULT '0000-00-00 00:00:00',
  FOREIGN KEY (`user_id`) REFERENCES `users` (`id`) ON DELETE NO ACTION ON UPDATE NO ACTION
) ENGINE=InnoDB DEFAULT CHARSET=latin1
You can run these scripts by using the SQL command prompt or PHPMyAdmin. On PHPMyAdmin, click/select the database you want these tables created under (in this case complete-blog-php), then click on the SQL tab on the navbar somewhere at the top of the page. If you see any SQL script in the space below, remove it and paste the script above into the space provided and click 'Go' to create the tables.
.png.2018-02-06.1517904796.png)
If you chose to create these tables manually instead, do remember to make the slug field on the post table UNIQUE, and remember to set the user_id field of posts table as the foreign key that references id on users table. Set NO ACTION as the value for the ON DELETE and ON UPDATE options so that when a user is deleted or updated, their posts remains on the posts table and is not deleted.
vli_adNow insert a few users into the users table and a few posts into the posts table. You can do that by running these SQL queries to insert:
users:
INSERT INTO `users` (`id`, `username`, `email`, `role`, `password`, `created_at`, `updated_at`) VALUES
(1, 'Awa', '[email protected]', 'Admin', 'mypassword', '2018-01-08 12:52:58', '2018-01-08 12:52:58')
posts:
INSERT INTO `posts` (`id`, `user_id`, `title`, `slug`, `views`, `image`, `body`, `published`, `created_at`, `updated_at`) VALUES
(1, 1, '5 Habits that can improve your life', '5-habits-that-can-improve-your-life', 0, 'banner.jpg', 'Read every day', 1, '2018-02-03 07:58:02', '2018-02-01 19:14:31'),
(2, 1, 'Second post on LifeBlog', 'second-post-on-lifeblog', 0, 'banner.jpg', 'This is the body of the second post on this site', 0, '2018-02-02 11:40:14', '2018-02-01 13:04:36')
Let's connect to the database, query these posts and display on the webpage.
In config.php, let's add code to connect our application to the database. After adding the code, our config.php file will looks like this:
<?php
        session_start();
        // connect to database
        $conn = mysqli_connect("localhost", "root", "", "complete-blog-php");

        if (!$conn) {
                die("Error connecting to database: " . mysqli_connect_error());
        }
    // define global constants
        define ('ROOT_PATH', realpath(dirname(__FILE__)));
        define('BASE_URL', 'http://localhost/complete-blog-php/');
?>
This returns a database connectivity object $conn which we can use in our entire application for querying the database.
This application has been structured in a way that PHP code is as separate from HTML as possible. Operations such as querying the database and performing some logic on data are done in PHP functions and the results sent to HTML to be displayed. Therefore to get all posts from the database, we will do that in a function and return the results as an associative array to be looped through and displayed on the page.
vli_adTherefore, create a file named public_functions.php in the includes folder. This file is going to hold all our PHP functions for the public area. All pages using any of the functions in this file must have this file included in the top section of the page.
Let's create our first function in our newly created public_functions.php. We'll name the function getPublishedPosts() and it will retrieve all posts from the posts table in the database and return them as an associative array:
public_functions.php:
<?php
/* * * * * * * * * * * * * * *
* Returns all published posts
* * * * * * * * * * * * * * */
function getPublishedPosts() {
        // use global $conn object in function
        global $conn;
        $sql = "SELECT * FROM posts WHERE published=true";
        $result = mysqli_query($conn, $sql);

        // fetch all posts as an associative array called $posts
        $posts = mysqli_fetch_all($result, MYSQLI_ASSOC);

        return $posts;
}

// more functions to come here ...
?>
At the top section of the index.php file, just below the line that includes config.php, add this code to query the database:
<!-- config.php should be here as the first include  -->

<?php require_once( ROOT_PATH . '/includes/public_functions.php') ?>

<!-- Retrieve all posts from database  -->
<?php $posts = getPublishedPosts(); ?>
We added two lines of code. The first includes the public_functions.php (which holds the functions) file to our index.php file. The second line of code calls the getPublishedPosts() function which queries the database and returns posts retrieved from the database in a variable called $posts. Now let's loop through and display these posts on the index.php page.
adOpen our famous index.php file again. In the content section somewhere in the middle, you will find a <hr> tag and a comment indicating where more content is to come. In the space, right below the <hr> tag, add this code:
<hr>
<!-- more content still to come here ... -->

<!-- Add this ... -->
<?php foreach ($posts as $post): ?>
        <div class="post" style="margin-left: 0px;">
                <img src="<?php echo BASE_URL . '/static/images/' . $post['image']; ?>" class="post_image" alt="">
                <a href="single_post.php?post-slug=<?php echo $post['slug']; ?>">
                        <div class="post_info">
                                <h3><?php echo $post['title'] ?></h3>
                                <div class="info">
                                        <span><?php echo date("F j, Y ", strtotime($post["created_at"])); ?></span>
                                        <span class="read_more">Read more...</span>
                                </div>
                        </div>
                </a>
        </div>
<?php endforeach ?>
Okay pleeease don't reload the page just yet. Let's add styling to this post listing. Open public_styling.css and add this code to it:
/* CONTENT */
.content {
        margin: 5px auto;
        border-radius: 5px;
        min-height: 400px;
}
.content:after {
        content: "";
        display: block;
        clear: both;
}
.content .content-title {
        margin: 10px 0px;
        color: #374447;
        font-family: 'Averia Serif Libre', cursive;
}
.content .post {
        width: 335px;
        margin: 9px;
        min-height: 320px;
        float: left;
        border-radius: 2px;
        border: 1px solid #b3b3b3;
        position: relative;
}
.content .post .category {
        margin-top: 0px;
        padding: 3px 8px;
        color: #374447;
        background: white;
        display: inline-block;
        border-radius: 2px;
        border: 1px solid #374447;
        box-shadow: 3px 2px 2px;
        position: absolute;
        left: 5px; top: 5px;
        z-index: 3;
}
.content .post .category:hover {
        box-shadow: 3px 2px 2px;
        color: white;
        background: #374447;
        transition: .4s;
        opacity: 1;
}
.content .post .post_image {
        height: 260px;
        width: 100%;
        background-size: 100%;
}
.content .post .post_image {
        width: 100%;
        height: 260px;
}
.content .post .post_info {
        height: 100%;
        padding: 0px 5px;
        font-weight: 200;
    font-family: 'Noto Serif', serif;
}
.content .post .post_info {
        color: #222;
}
.content .post .post_info span {
        color: #A6A6A6;
        font-style: italic;
}
.content .post .post_info span.read_more {
        position: absolute;
        right: 5px; bottom: 5px;
}
Now you can reload the page.
adIf all went well, you'll see a single post styled as a thumbnail below the "Recent articles" title. Remember we had inserted two records in the database but only one is being displayed. This is so because one of the records had its published field set to false (that is, 0), and since only published articles get to be displayed, we see only one, the published one.
But our posts as of now are not classified under any topic. Let's create a topics table and form a Many-to-Many relationship between the posts and the topics table. To do this, we'll create two new tables: topics to store topics, and post_topic table to handle the relationship between posts and topics.
topics:
+----+-----------+------------------------+------------+
|     field      |     type               | specs      |
+----+-----------+------------------------+------------+
|  id            | INT(11)                |            |
|  name          | VARCHAR(255)           |            |
|  slug          | VARCHAR(255)           | UNIQUE     |
+----------------+--------------+---------+------------+
post_topic:
+----+-----------+------------------------+------------+
|     field      |     type               | specs      |
+----+-----------+------------------------+------------+
|  id            | INT(11)                |            |
|  post_id       | INT(11)                |  UNIQUE    |
|  topic_id      | INT(11)                |            |
+----------------+--------------+---------+------------+
What we are really interested in is the post_topic table. This is the table that handles the relationship between posts and topics. When a post is created under a particular topic, the id of that post (post_id), as well as the id of the topic (topic_id) under which that post is created, are inserted in the post_topic table.
Let's establish this relationship so that when a post is deleted, their entry in the post_topic table will automatically be deleted too; you don't want to keep info about a post's relationship when the post doesn't exist right?
Click/select the post_topic table, then click on the structure tab of the PHPMyAdmin navbar. Next, click on Relation View just underneath the structure tab (it could be found somewhere else depending on your version of PHPMyAdmin). Then fill the form below as follows:
.png.2018-02-08.1518069990.png)
Tip: The +Add constraint link is used to add a new constraint.
ON DELETE and ON UPDATE are all set to CASCADE and NO ACTION respectively so that when a post or a topic is deleted, it's relationship info in the post_topic table is automatically deleted too. (In the image I made a mistake of setting ON UPDATE to CASCADE instead of NO ACTION, sorry for that).
Click save and that's it. The tables are now related. But to establish a relationship between posts and topics, we need to populate the topics table with topics and eventually the post_topic table which is the actual relationship info.
Now let's insert a few entries into the two tables:
topics:
INSERT INTO `topics` (`id`, `name`, `slug`) VALUES
(1, 'Inspiration', 'inspiration'),
(2, 'Motivation', 'motivation'),
(3, 'Diary', 'diary')
post_topic:
INSERT INTO `post_topic` (`id`, `post_id`, `topic_id`) VALUES
(1, 1, 1),
(2, 2, 2)
The relationship defined on the post_topic table says that the topic with id 1 on the topics table belongs to the post with id 1 on the posts table. The same holds true for the topic with id 2 and post with id 2.
On each post listing on the index.php page, we are going to display the topic under which the post is created.
To do this, we have to modify our getPublishedPosts() we created inside public_functions.php to query the topic of each post from the database and return the post alongside its topic.
adModify the public_functions.php file to look like this:
<?php
/* * * * * * * * * * * * * * *
* Returns all published posts
* * * * * * * * * * * * * * */
function getPublishedPosts() {
        // use global $conn object in function
        global $conn;
        $sql = "SELECT * FROM posts WHERE published=true";
        $result = mysqli_query($conn, $sql);
        // fetch all posts as an associative array called $posts
        $posts = mysqli_fetch_all($result, MYSQLI_ASSOC);

        $final_posts = array();
        foreach ($posts as $post) {
                $post['topic'] = getPostTopic($post['id']);
                array_push($final_posts, $post);
        }
        return $final_posts;
}
/* * * * * * * * * * * * * * *
* Receives a post id and
* Returns topic of the post
* * * * * * * * * * * * * * */
function getPostTopic($post_id){
        global $conn;
        $sql = "SELECT * FROM topics WHERE id=
                        (SELECT topic_id FROM post_topic WHERE post_id=$post_id) LIMIT 1";
        $result = mysqli_query($conn, $sql);
        $topic = mysqli_fetch_assoc($result);
        return $topic;
}
?>
Now go to index.php file. Inside the foreach loop, directly below the image tag <img />, add the if statement to display topic. Your foreach loop should look like this after modifying:
<?php foreach ($posts as $post): ?>
        <div class="post" style="margin-left: 0px;">
                <img src="<?php echo BASE_URL . '/static/images/' . $post['image']; ?>" class="post_image" alt="">
        <!-- Added this if statement... -->
                <?php if (isset($post['topic']['name'])): ?>
                        <a
                                href="<?php echo BASE_URL . 'filtered_posts.php?topic=' . $post['topic']['id'] ?>"
                                class="btn category">
                                <?php echo $post['topic']['name'] ?>
                        </a>
                <?php endif ?>

                <a href="single_post.php?post-slug=<?php echo $post['slug']; ?>">
                        <div class="post_info">
                                <h3><?php echo $post['title'] ?></h3>
                                <div class="info">
                                        <span><?php echo date("F j, Y ", strtotime($post["created_at"])); ?></span>
                                        <span class="read_more">Read more...</span>
                                </div>
                        </div>
                </a>
        </div>
<?php endforeach ?>
Now reload the page and you'll see the topic displayed in the post.
Inside this foreach loop, you notice that there are two links which when clicked, will take you to two pages: filtered_posts.php and single_post.php.
filtered_posts.php is a page that lists all the posts under a particular topic when the user clicks on that topic.
single_post.php is a page that displays the full post in detail together with comments when the user clicks on the post thumbnail.
adThese two files need a few functions from our public_functions.php file. filtered_posts.php needs two function called getPublishedPostsByTopic() and getTopicNameById() while single_posts.php needs getPost() and getAllTopics().
Let's start with filtered_posts.php file. Open public_functions.php and add these two functions to the list of functions:
/* * * * * * * * * * * * * * * *
* Returns all posts under a topic
* * * * * * * * * * * * * * * * */
function getPublishedPostsByTopic($topic_id) {
        global $conn;
        $sql = "SELECT * FROM posts ps
                        WHERE ps.id IN
                        (SELECT pt.post_id FROM post_topic pt
                                WHERE pt.topic_id=$topic_id GROUP BY pt.post_id
                                HAVING COUNT(1) = 1)";
        $result = mysqli_query($conn, $sql);
        // fetch all posts as an associative array called $posts
        $posts = mysqli_fetch_all($result, MYSQLI_ASSOC);

        $final_posts = array();
        foreach ($posts as $post) {
                $post['topic'] = getPostTopic($post['id']);
                array_push($final_posts, $post);
        }
        return $final_posts;
}
/* * * * * * * * * * * * * * * *
* Returns topic name by topic id
* * * * * * * * * * * * * * * * */
function getTopicNameById($id)
{
        global $conn;
        $sql = "SELECT name FROM topics WHERE id=$id";
        $result = mysqli_query($conn, $sql);
        $topic = mysqli_fetch_assoc($result);
        return $topic['name'];
}
Let's first Create the filtered_posts.php file in the root folder of our application (that is, complete-blog-php/filtered_posts.php). I'll just go ahead and paste the entire code of this page inside the file:
filtered_posts.php:
<?php include('config.php'); ?>
<?php include('includes/public_functions.php'); ?>
<?php include('includes/head_section.php'); ?>
<?php
        // Get posts under a particular topic
        if (isset($_GET['topic'])) {
                $topic_id = $_GET['topic'];
                $posts = getPublishedPostsByTopic($topic_id);
        }
?>
        <title>LifeBlog | Home </title>
</head>
<body>
<div class="container">
<!-- Navbar -->
        <?php include( ROOT_PATH . '/includes/navbar.php'); ?>
<!-- // Navbar -->
<!-- content -->
<div class="content">
        <h2 class="content-title">
                Articles on <u><?php echo getTopicNameById($topic_id); ?></u>
        </h2>
        <hr>
        <?php foreach ($posts as $post): ?>
                <div class="post" style="margin-left: 0px;">
                        <img src="<?php echo BASE_URL . '/static/images/' . $post['image']; ?>" class="post_image" alt="">
                        <a href="single_post.php?post-slug=<?php echo $post['slug']; ?>">
                                <div class="post_info">
                                        <h3><?php echo $post['title'] ?></h3>
                                        <div class="info">
                                                <span><?php echo date("F j, Y ", strtotime($post["created_at"])); ?></span>
                                                <span class="read_more">Read more...</span>
                                        </div>
                                </div>
                        </a>
                </div>
        <?php endforeach ?>
</div>
<!-- // content -->
</div>
<!-- // container -->

<!-- Footer -->
        <?php include( ROOT_PATH . '/includes/footer.php'); ?>
<!-- // Footer -->
Now refresh the page, click on the topic and if it takes you to a page displaying posts under that topic, then you're doing the right thing.
adLet's do the same thing with single_post.php. Open public_functions.php and add these 2 functions to it:
/* * * * * * * * * * * * * * *
* Returns a single post
* * * * * * * * * * * * * * */
function getPost($slug){
        global $conn;
        // Get single post slug
        $post_slug = $_GET['post-slug'];
        $sql = "SELECT * FROM posts WHERE slug='$post_slug' AND published=true";
        $result = mysqli_query($conn, $sql);

        // fetch query results as associative array.
        $post = mysqli_fetch_assoc($result);
        if ($post) {
                // get the topic to which this post belongs
                $post['topic'] = getPostTopic($post['id']);
        }
        return $post;
}
/* * * * * * * * * * * *
*  Returns all topics
* * * * * * * * * * * * */
function getAllTopics()
{
        global $conn;
        $sql = "SELECT * FROM topics";
        $result = mysqli_query($conn, $sql);
        $topics = mysqli_fetch_all($result, MYSQLI_ASSOC);
        return $topics;
}
Now create the file complete-blog-php/single_post.php and paste this code into it:
<?php  include('config.php'); ?>
<?php  include('includes/public_functions.php'); ?>
<?php
        if (isset($_GET['post-slug'])) {
                $post = getPost($_GET['post-slug']);
        }
        $topics = getAllTopics();
?>
<?php include('includes/head_section.php'); ?>
<title> <?php echo $post['title'] ?> | LifeBlog</title>
</head>
<body>
<div class="container">
        <!-- Navbar -->
                <?php include( ROOT_PATH . '/includes/navbar.php'); ?>
        <!-- // Navbar -->

        <div class="content" >
                <!-- Page wrapper -->
                <div class="post-wrapper">
                        <!-- full post div -->
                        <div class="full-post-div">
                        <?php if ($post['published'] == false): ?>
                                <h2 class="post-title">Sorry... This post has not been published</h2>
                        <?php else: ?>
                                <h2 class="post-title"><?php echo $post['title']; ?></h2>
                                <div class="post-body-div">
                                        <?php echo html_entity_decode($post['body']); ?>
                                </div>
                        <?php endif ?>
                        </div>
                        <!-- // full post div -->

                        <!-- comments section -->
                        <!--  coming soon ...  -->
                </div>
                <!-- // Page wrapper -->

                <!-- post sidebar -->
                <div class="post-sidebar">
                        <div class="card">
                                <div class="card-header">
                                        <h2>Topics</h2>
                                </div>
                                <div class="card-content">
                                        <?php foreach ($topics as $topic): ?>
                                                <a
                                                        href="<?php echo BASE_URL . 'filtered_posts.php?topic=' . $topic['id'] ?>">
                                                        <?php echo $topic['name']; ?>
                                                </a>
                                        <?php endforeach ?>
                                </div>
                        </div>
                </div>
                <!-- // post sidebar -->
        </div>
</div>
<!-- // content -->

<?php include( ROOT_PATH . '/includes/footer.php'); ?>
ad
Let's now apply styling to this. Open public_styling.css and add this styling code to it:
/* * * * * * * * *
* SINGLE PAGE
* * * * * * * * */
.content .post-wrapper {
        width: 70%;
        float: left;
        min-height: 250px;
}
.full-post-div {
        min-height: 300px;
        padding: 20px;
        border: 1px solid #e4e1e1;
        border-radius: 2px;
}
.full-post-div h2.post-title {
        margin: 10px auto 20px;
        text-align: center;
}
.post-body-div {
        font-family: 'Noto Serif', serif;
        font-size: 1.2em;
}
.post-body-div p {
        margin:20px 0px;
}
.post-sidebar {
        width: 24%;
        float: left;
        margin-left: 5px;
        min-height: 400px;
}
.content .post-comments {
        margin-top: 25px;
        border-radius: 2px;
        border-top: 1px solid #e4e1e1;
        padding: 10px;
}
.post-sidebar .card {
        width: 95%;
        margin: 10px auto;
        border: 1px solid #e4e1e1;
        border-radius: 10px 10px 0px 0px;
}
.post-sidebar .card .card-header {
        padding: 10px;
        text-align: center;
        border-radius: 3px 3px 0px 0px;
        background: #3E606F;
}
.post-sidebar .card .card-header h2 {
        color: white;
}
.post-sidebar .card .card-content a {
        display: block;
        box-sizing: border-box;
        padding: 8px 10px;
        border-bottom: 1px solid #e4e1e1;
        color: #444;
}
.post-sidebar .card .card-content a:hover {
        padding-left: 20px;
        background: #F9F9F9;
        transition: 0.1s;
}
Looks good now right?
One last thing to do and we'll be pretty much done with the public area: We'll be implementing user registration and login.
adUser registration and login
Because I have already made a tutorial on user registration and login, I will be pretty much to the point with this part and won't do much explaining.
Create two files in your root folder named register.php and login.php. Open each of them and place this code in them:
register.php:
<?php  include('config.php'); ?>
<!-- Source code for handling registration and login -->
<?php  include('includes/registration_login.php'); ?>

<?php include('includes/head_section.php'); ?>

<title>LifeBlog | Sign up </title>
</head>
<body>
<div class="container">
        <!-- Navbar -->
                <?php include( ROOT_PATH . '/includes/navbar.php'); ?>
        <!-- // Navbar -->

        <div style="width: 40%; margin: 20px auto;">
                <form method="post" action="register.php" >
                        <h2>Register on LifeBlog</h2>
                        <?php include(ROOT_PATH . '/includes/errors.php') ?>
                        <input  type="text" name="username" value="<?php echo $username; ?>"  placeholder="Username">
                        <input type="email" name="email" value="<?php echo $email ?>" placeholder="Email">
                        <input type="password" name="password_1" placeholder="Password">
                        <input type="password" name="password_2" placeholder="Password confirmation">
                        <button type="submit" class="btn" name="reg_user">Register</button>
                        <p>
                                Already a member? <a href="login.php">Sign in</a>
                        </p>
                </form>
        </div>
</div>
<!-- // container -->
<!-- Footer -->
        <?php include( ROOT_PATH . '/includes/footer.php'); ?>
<!-- // Footer -->
login.php:
<?php  include('config.php'); ?>
<?php  include('includes/registration_login.php'); ?>
<?php  include('includes/head_section.php'); ?>
        <title>LifeBlog | Sign in </title>
</head>
<body>
<div class="container">
        <!-- Navbar -->
        <?php include( ROOT_PATH . '/includes/navbar.php'); ?>
        <!-- // Navbar -->

        <div style="width: 40%; margin: 20px auto;">
                <form method="post" action="login.php" >
                        <h2>Login</h2>
                        <?php include(ROOT_PATH . '/includes/errors.php') ?>
                        <input type="text" name="username" value="<?php echo $username; ?>" value="" placeholder="Username">
                        <input type="password" name="password" placeholder="Password">
                        <button type="submit" class="btn" name="login_btn">Login</button>
                        <p>
                                Not yet a member? <a href="register.php">Sign up</a>
                        </p>
                </form>
        </div>
</div>
<!-- // container -->

<!-- Footer -->
        <?php include( ROOT_PATH . '/includes/footer.php'); ?>
<!-- // Footer -->
In the top sections of both files, we included a file named registration_login.php to handle the logic of registration and login. This is the file to which the login and register form info will be submitted to and communication with the database will be done. Let's create it in our includes folder and spit this code inside it:
complete-blog-php/includes/registration_login.php:
<?php
// variable declaration
$username = "";
$email = "";
$errors = array();
// REGISTER USER
if (isset($_POST['reg_user'])) {
// receive all input values from the form
$username = esc($_POST['username']);
$email = esc($_POST['email']);
$password_1 = esc($_POST['password_1']);
$password_2 = esc($_POST['password_2']);
// form validation: ensure that the form is correctly filled
if (empty($username)) { array_push($errors, "Uhmm...We gonna need your username"); }
if (empty($email)) { array_push($errors, "Oops.. Email is missing"); }
if (empty($password_1)) { array_push($errors, "uh-oh you forgot the password"); }
if ($password_1 != $password_2) { array_push($errors, "The two passwords do not match");}
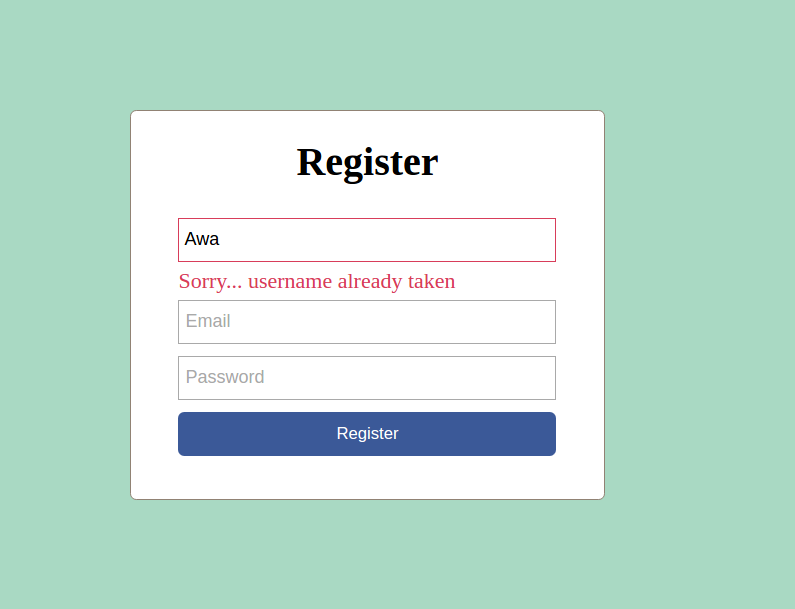
// Ensure that no user is registered twice.
// the email and usernames should be unique
$user_check_query = "SELECT * FROM users WHERE username='$username'
OR email='$email' LIMIT 1";
$result = mysqli_query($conn, $user_check_query);
$user = mysqli_fetch_assoc($result);
if ($user) { // if user exists
if ($user['username'] === $username) {
array_push($errors, "Username already exists");
}
if ($user['email'] === $email) {
array_push($errors, "Email already exists");
}
}
// register user if there are no errors in the form
if (count($errors) == 0) {
$password = md5($password_1);//encrypt the password before saving in the database
$query = "INSERT INTO users (username, email, password, created_at, updated_at)
VALUES('$username', '$email', '$password', now(), now())";
mysqli_query($conn, $query);
// get id of created user
$reg_user_id = mysqli_insert_id($conn);
// put logged in user into session array
$_SESSION['user'] = getUserById($reg_user_id);
// if user is admin, redirect to admin area
if ( in_array($_SESSION['user']['role'], ["Admin", "Author"])) {
$_SESSION['message'] = "You are now logged in";
// redirect to admin area
header('location: ' . BASE_URL . 'admin/dashboard.php');
exit(0);
} else {
$_SESSION['message'] = "You are now logged in";
// redirect to public area
header('location: index.php');
exit(0);
}
}
}
// LOG USER IN
if (isset($_POST['login_btn'])) {
$username = esc($_POST['username']);
$password = esc($_POST['password']);
if (empty($username)) { array_push($errors, "Username required"); }
if (empty($password)) { array_push($errors, "Password required"); }
if (empty($errors)) {
$password = md5($password); // encrypt password
$sql = "SELECT * FROM users WHERE username='$username' and password='$password' LIMIT 1";
$result = mysqli_query($conn, $sql);
if (mysqli_num_rows($result) > 0) {
// get id of created user
$reg_user_id = mysqli_fetch_assoc($result)['id'];
// put logged in user into session array
$_SESSION['user'] = getUserById($reg_user_id);
// if user is admin, redirect to admin area
if ( in_array($_SESSION['user']['role'], ["Admin", "Author"])) {
$_SESSION['message'] = "You are now logged in";
// redirect to admin area
header('location: ' . BASE_URL . '/admin/dashboard.php');
exit(0);
} else {
$_SESSION['message'] = "You are now logged in";
// redirect to public area
header('location: index.php');
exit(0);
}
} else {
array_push($errors, 'Wrong credentials');
}
}
}
// escape value from form
function esc(String $value)
{
// bring the global db connect object into function
global $conn;
$val = trim($value); // remove empty space sorrounding string
$val = mysqli_real_escape_string($conn, $value);
return $val;
}
// Get user info from user id
function getUserById($id)
{
global $conn;
$sql = "SELECT * FROM users WHERE id=$id LIMIT 1";
$result = mysqli_query($conn, $sql);
$user = mysqli_fetch_assoc($result);
// returns user in an array format:
// ['id'=>1 'username' => 'Awa', 'email'=>'[email protected]', 'password'=> 'mypass']
return $user;
}
?>ad
Go to http://localhost/complete-blog-php/register.php and you'll see an error saying that errors.php file not found.
errors.php file is the file with code to display form validation errors. Create errors.php inside complete-blog-php/includes and paste this code in it:
<?php if (count($errors) > 0) : ?>
  <div class="message error validation_errors" >
        <?php foreach ($errors as $error) : ?>
          <p><?php echo $error ?></p>
        <?php endforeach ?>
  </div>
<?php endif ?>
Once again open public_styling.css let's add this last piece of styling code for this errors.php file and a few other elements:
/* NOTIFICATION MESSAGES */
.message {
        width: 100%;
        margin: 0px auto;
        padding: 10px 0px;
        color: #3c763d;
        background: #dff0d8;
        border: 1px solid #3c763d;
        border-radius: 5px;
        text-align: center;
}
.error {
        color: #a94442;
        background: #f2dede;
        border: 1px solid #a94442;
        margin-bottom: 20px;
}
.validation_errors p {
        text-align: left;
        margin-left: 10px;
}
.logged_in_info {
        text-align: right;
        padding: 10px;
}
And now the error message is gone. Click on the register button without filling the form and you see beautiful error messages rendered.
Let's create a new user by filling the form on the register.php page and clicking on the register button. You can provide whatever valid info for the username, email, and password; just make sure you remember them because we will use them to log in very soon on the login page.
adWhen a user logs in, they'll definitely need to be able to log out. In the root folder of the application, create a file named logout.php.
complete-blog-php/logout.php:
<?php
        session_start();
        session_unset($_SESSION['user']);
        session_destroy();
        header('location: index.php');
?>
Also when a user logs in, we want to display their name and a link or button for them to click to log out. For the public area, we'll do that in the banner.php file we included. Open banner.php file and modify the code to look like this:
complete-blog-php/includes/banner.php:
<?php if (isset($_SESSION['user']['username'])) { ?>
        <div class="logged_in_info">
                <span>welcome <?php echo $_SESSION['user']['username'] ?></span>
                |
                <span><a href="logout.php">logout</a></span>
        </div>
<?php }else{ ?>
        <div class="banner">
                <div class="welcome_msg">
                        <h1>Today's Inspiration</h1>
                        <p>
                            One day your life <br>
                            will flash before your eyes. <br>
                            Make sure it's worth watching. <br>
                                <span>~ Gerard Way</span>
                        </p>
                        <a href="register.php" class="btn">Join us!</a>
                </div>

                <div class="login_div">
                        <form action="<?php echo BASE_URL . 'index.php'; ?>" method="post" >
                                <h2>Login</h2>
                                <div style="width: 60%; margin: 0px auto;">
                                        <?php include(ROOT_PATH . '/includes/errors.php') ?>
                                </div>
                                <input type="text" name="username" value="<?php echo $username; ?>" placeholder="Username">
                                <input type="password" name="password"  placeholder="Password">
                                <button class="btn" type="submit" name="login_btn">Sign in</button>
                        </form>
                </div>
        </div>
<?php } ?>
It checks the session to see if a user is available (logged in). If logged in, the username is displayed with the logout link. When there is a logged in user, the banner does not get displayed since it is some sort of a welcome screen to guest users.
You notice that the banner has a login form and this banner is included inside index.php file. Therefore we need to include the code that handles registration and login inside our index.php file also. Open index.php and add this line directly under the include for public_functions.php:
top section of complete-blog-php/index.php:
<?php require_once( ROOT_PATH . '/includes/registration_login.php') ?>
And that's it with user registration and login. In the next section, we begin work on the admin area.
Thank you so much for sticking around up to this point. I hope you found it helpful. If you have any worries, please leave it in the comments below. Your feedback is always very helpful and if you have any bugs in your code, I will try my best to help you out.
I will be very much encouraged to create more of these tutorials with improved quality if you share, subscribe to my site and recommend my site to your friends.
Awa Melvine
Next part: Backend (Admin area)
ad