In this tutorial, I walk you through the complete process of creating a user registration system where users can create an account by providing username, email and password, login and logout using PHP and MySQL. I will also show you how you can make some pages accessible only to logged-in users. Any other user not logged in will not be able to access the page.
The first thing we'll need to do is set up our database.
Create a database called registration. In the registration database, add a table called users. The users table will take the following four fields.
- id
- username - varchar(100)
- email - varchar(100)
- password - varchar(100)
You can create this using a MySQL client like PHPMyAdmin.

Or you can create it on the MySQL prompt using the following SQL script:
CREATE TABLE `users` (
  `id` int(11) NOT NULL AUTO_INCREMENT PRIMARY KEY,
  `username` varchar(100) NOT NULL,
  `email` varchar(100) NOT NULL,
  `password` varchar(100) NOT NULL
) ENGINE=InnoDB DEFAULT CHARSET=latin1;
And that's it with the database.
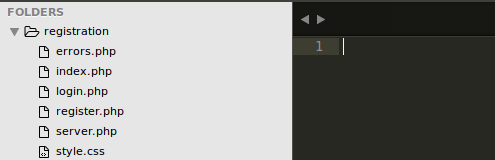
Now create a folder called registration in a directory accessible to our server. i.e create the folder inside htdocs (if you are using XAMPP server) or inside www (if you are using wampp server).
Inside the folder registration, create the following files:
Open these files up in a text editor of your choice. Mine is Sublime Text 3.
Registering a user
Open the register.php file and paste the following code in it:
regiser.php:
<?php include('server.php') ?>
<!DOCTYPE html>
<html>
<head>
  <title>Registration system PHP and MySQL</title>
  <link rel="stylesheet" type="text/css" href="style.css">
</head>
<body>
  <div class="header">
        <h2>Register</h2>
  </div>

  <form method="post" action="register.php">
        <?php include('errors.php'); ?>
        <div class="input-group">
          <label>Username</label>
          <input type="text" name="username" value="<?php echo $username; ?>">
        </div>
        <div class="input-group">
          <label>Email</label>
          <input type="email" name="email" value="<?php echo $email; ?>">
        </div>
        <div class="input-group">
          <label>Password</label>
          <input type="password" name="password_1">
        </div>
        <div class="input-group">
          <label>Confirm password</label>
          <input type="password" name="password_2">
        </div>
        <div class="input-group">
          <button type="submit" class="btn" name="reg_user">Register</button>
        </div>
        <p>
                Already a member? <a href="login.php">Sign in</a>
        </p>
  </form>
</body>
</html>
Nothing complicated so far right?
ez_adA few things to note here:
First is that our form's action attribute is set to register.php. This means that when the form submit button is clicked, all the data in the form will be submitted to the same page (register.php). The part of the code that receives this form data is written in the server.php file and that's why we are including it at the very top of the register.php file.
Notice also that we are including the errors.php file to display form errors. We will come to that soon.
As you can see in the head section, we are linking to a style.css file. Open up the style.css file and paste the following CSS in it:
* {
  margin: 0px;
  padding: 0px;
}
body {
  font-size: 120%;
  background: #F8F8FF;
}

.header {
  width: 30%;
  margin: 50px auto 0px;
  color: white;
  background: #5F9EA0;
  text-align: center;
  border: 1px solid #B0C4DE;
  border-bottom: none;
  border-radius: 10px 10px 0px 0px;
  padding: 20px;
}
form, .content {
  width: 30%;
  margin: 0px auto;
  padding: 20px;
  border: 1px solid #B0C4DE;
  background: white;
  border-radius: 0px 0px 10px 10px;
}
.input-group {
  margin: 10px 0px 10px 0px;
}
.input-group label {
  display: block;
  text-align: left;
  margin: 3px;
}
.input-group input {
  height: 30px;
  width: 93%;
  padding: 5px 10px;
  font-size: 16px;
  border-radius: 5px;
  border: 1px solid gray;
}
.btn {
  padding: 10px;
  font-size: 15px;
  color: white;
  background: #5F9EA0;
  border: none;
  border-radius: 5px;
}
.error {
  width: 92%;
  margin: 0px auto;
  padding: 10px;
  border: 1px solid #a94442;
  color: #a94442;
  background: #f2dede;
  border-radius: 5px;
  text-align: left;
}
.success {
  color: #3c763d;
  background: #dff0d8;
  border: 1px solid #3c763d;
  margin-bottom: 20px;
}
Now the form looks beautiful.
vli_adLet's now write the code that will receive information submitted from the form and store (register) the information in the database. As promised earlier, we do this in the server.php file.
Open server.php and paste this code in it:
server.php
<?php
session_start();
// initializing variables
$username = "";
$email = "";
$errors = array();
// connect to the database
$db = mysqli_connect('localhost', 'root', '', 'registration');
// REGISTER USER
if (isset($_POST['reg_user'])) {
// receive all input values from the form
$username = mysqli_real_escape_string($db, $_POST['username']);
$email = mysqli_real_escape_string($db, $_POST['email']);
$password_1 = mysqli_real_escape_string($db, $_POST['password_1']);
$password_2 = mysqli_real_escape_string($db, $_POST['password_2']);
// form validation: ensure that the form is correctly filled ...
// by adding (array_push()) corresponding error unto $errors array
if (empty($username)) { array_push($errors, "Username is required"); }
if (empty($email)) { array_push($errors, "Email is required"); }
if (empty($password_1)) { array_push($errors, "Password is required"); }
if ($password_1 != $password_2) {
array_push($errors, "The two passwords do not match");
}
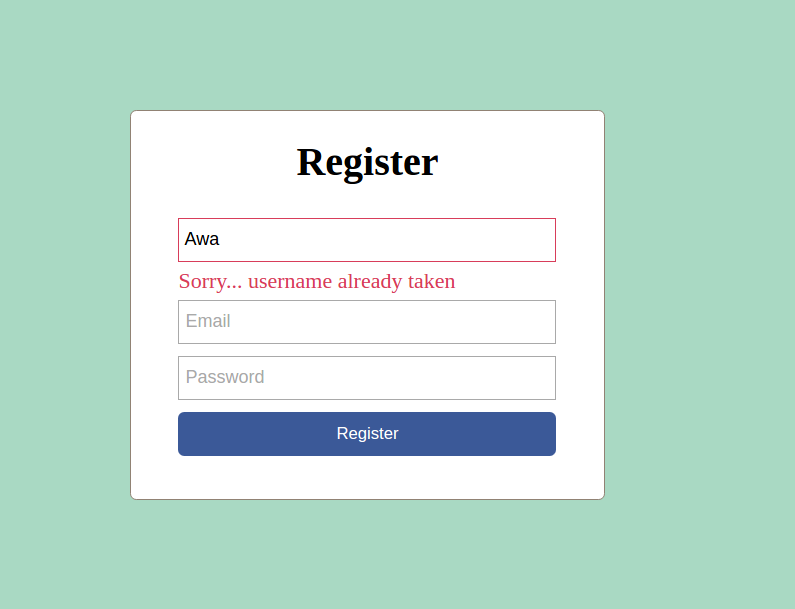
// first check the database to make sure
// a user does not already exist with the same username and/or email
$user_check_query = "SELECT * FROM users WHERE username='$username' OR email='$email' LIMIT 1";
$result = mysqli_query($db, $user_check_query);
$user = mysqli_fetch_assoc($result);
if ($user) { // if user exists
if ($user['username'] === $username) {
array_push($errors, "Username already exists");
}
if ($user['email'] === $email) {
array_push($errors, "email already exists");
}
}
// Finally, register user if there are no errors in the form
if (count($errors) == 0) {
$password = md5($password_1);//encrypt the password before saving in the database
$query = "INSERT INTO users (username, email, password)
VALUES('$username', '$email', '$password')";
mysqli_query($db, $query);
$_SESSION['username'] = $username;
$_SESSION['success'] = "You are now logged in";
header('location: index.php');
}
}
// ...
Sessions are used to track logged in users and so we include a session_start() at the top of the file.
The comments in the code pretty much explain everything, but I'll highlight a few things here.
The if statement determines if the reg_user button on the registration form is clicked. Remember, in our form, the submit button has a name attribute set to reg_user and that is what we are referencing in the if statement.
All the data is received from the form and checked to make sure that the user correctly filled the form. Passwords are also compared to make sure they match.
If no errors were encountered, the user is registered in the users table in the database with a hashed password. The hashed password is for security reasons. It ensures that even if a hacker manages to gain access to your database, they would not be able to read your password.
But error messages are not displaying now because our errors.php file is still empty. To display the errors, paste this code in the errors.php file.
<?php  if (count($errors) > 0) : ?>
  <div class="error">
        <?php foreach ($errors as $error) : ?>
          <p><?php echo $error ?></p>
        <?php endforeach ?>
  </div>
<?php  endif ?>
When a user is registered in the database, they are immediately logged in and redirected to the index.php page.
And that's it for registration. Let's look at user login.
vli_adLogin user
Logging a user in is an even easier thing to do. Just open the login page and put this code inside it:
<?php include('server.php') ?>
<!DOCTYPE html>
<html>
<head>
  <title>Registration system PHP and MySQL</title>
  <link rel="stylesheet" type="text/css" href="style.css">
</head>
<body>
  <div class="header">
        <h2>Login</h2>
  </div>

  <form method="post" action="login.php">
        <?php include('errors.php'); ?>
        <div class="input-group">
                <label>Username</label>
                <input type="text" name="username" >
        </div>
        <div class="input-group">
                <label>Password</label>
                <input type="password" name="password">
        </div>
        <div class="input-group">
                <button type="submit" class="btn" name="login_user">Login</button>
        </div>
        <p>
                Not yet a member? <a href="register.php">Sign up</a>
        </p>
  </form>
</body>
</html>
Everything on this page is quite similar to the register.php page.
Now the code that logs the user in is to be written in the same server.php file. So open the server.php file and add this code at the end of the file:
// ...

// LOGIN USER
if (isset($_POST['login_user'])) {
  $username = mysqli_real_escape_string($db, $_POST['username']);
  $password = mysqli_real_escape_string($db, $_POST['password']);

  if (empty($username)) {
        array_push($errors, "Username is required");
  }
  if (empty($password)) {
        array_push($errors, "Password is required");
  }

  if (count($errors) == 0) {
        $password = md5($password);
        $query = "SELECT * FROM users WHERE username='$username' AND password='$password'";
        $results = mysqli_query($db, $query);
        if (mysqli_num_rows($results) == 1) {
          $_SESSION['username'] = $username;
          $_SESSION['success'] = "You are now logged in";
          header('location: index.php');
        }else {
                array_push($errors, "Wrong username/password combination");
        }
  }
}

?>
Again all this does is check if the user has filled the form correctly, verifies that their credentials match a record from the database and logs them in if it does. After logging in, the user is redirected them to the index.php file with a success message.
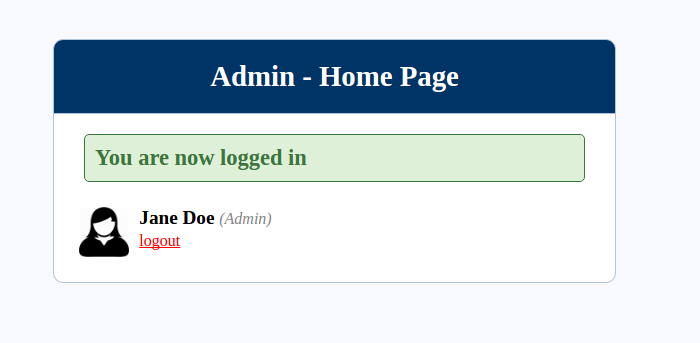
ez_adNow let's see what happens in the index.php file. Open it up and paste the following code in it:
<?php
  session_start();

  if (!isset($_SESSION['username'])) {
        $_SESSION['msg'] = "You must log in first";
        header('location: login.php');
  }
  if (isset($_GET['logout'])) {
        session_destroy();
        unset($_SESSION['username']);
        header("location: login.php");
  }
?>
<!DOCTYPE html>
<html>
<head>
        <title>Home</title>
        <link rel="stylesheet" type="text/css" href="style.css">
</head>
<body>

<div class="header">
        <h2>Home Page</h2>
</div>
<div class="content">
        <!-- notification message -->
        <?php if (isset($_SESSION['success'])) : ?>
      <div class="error success" >
        <h3>
          <?php
                echo $_SESSION['success'];
                unset($_SESSION['success']);
          ?>
        </h3>
      </div>
        <?php endif ?>

    <!-- logged in user information -->
    <?php  if (isset($_SESSION['username'])) : ?>
        <p>Welcome <strong><?php echo $_SESSION['username']; ?></strong></p>
        <p> <a href="index.php?logout='1'" style="color: red;">logout</a> </p>
    <?php endif ?>
</div>

</body>
</html>
The first if statement checks if the user is already logged in. If they are not logged in, they will be redirected to the login page. Hence this page is accessible to only logged in users. If you'd like to make any page accessible only to logged in users, all you have to do is place this if statement at the top of the file.
The second if statement checks if the user has clicked the logout button. If yes, the system logs them out and redirects them back to the login page.
And that's it!
Now go on, customize it to suit your needs and build an awesome site. If you have any worries or anything you need to clarify, leave it in the comments below and help will come.
You can always support by sharing on social media or recommending my blog to your friends and colleagues.
Best regards :D
Awa Melvine